
|
Products
|
Contacts |
|
aaaaaaaaaaaaaaaaaaShandong Boda Pipes Industry CO.,Ltd |
Product
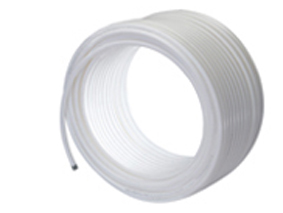
PE-RT pipe
PE-RT Installation Instructions
1、 Cut Pipes: cut pipes to the required length, and the cut should be vertical to pipe’s axis line and should be burr-free and clean. Set appropriate weld length on the pipes.
2、Prepare Hot-melting Welding Machine: install the hot-melting machine and get it charged according to the pipe installation specification.
3、 Hot-melting Connection: after the hot-melting welding machine reaches the working temperature, prepare pipes and fittings and insert them into the die head of the machine to appropriate depth; when pipes and fitting are heated for a required period of time, immediately insert fittings into the pipes without swirling and form the even flange on the joints, then keep it for 2-5s, and cool it naturally.
Hot-melt Welding Technical Parameters
|
DN(mm) |
Welding Depth(mm) |
Heating Time(s) |
Socketing Time(s) |
Cooling Time(s) |
|
20
|
15
|
5
|
4
|
2
|
|
25
|
17
|
7
|
4
|
2
|
|
32
|
19
|
8
|
6
|
4
|
Construction and Installation of Radiant Floor Heating
Construction Processes of Radiant Floor Heating Structure: finish floor level and find square line-----clean the floor base-----make level-----lay thermal insulating layers (polystyrene board and others)-----lay plastic pipes-----adjust spaces and fix pipes----install distribution devices----close with distribution system----preserve heat of corners-----conduct bulge test-----pour fine aggregate concrete to coat cushion----re-conduct pressing test-----make the ground floor after it is tested to be qualified.(In general, it is not suitable to construct in winter)
Finish floor level and find square line: clean the floor base and make level.
Base structure is required to be level: uneven allowable deviation should be <8mm, and uneven parts should be made level with cement and mortar (1:2).
Arrange thermal insulating layers: apply heated board featuring light weight, certain bearing pressure, low hydroscopicity and the thermal insulating material that is noninflammable or fire-resistant, effective and with low thermal conductivity; the thickness of the board is 20-30mm and its physical property should comply with following requirements:
a. thermal conductivity should be <0.05w/m.k b. compression stress should be >100kpa
c. water absorption should be <4% d. oxygen index should be >32
Lay reflecting layer: plastic pipes should be laid on the composite thermal insulating material that is pasted with face-up aluminum foil; when heated board is laid, the ground need to be level and seams of insulating layer should be pasted with tape.
Lay plastic pipes, adjust spaces and fix pipes: lay plastic pipes from the distant to the near ring by ring on the heated board; fix pipes that apply special plastic cards (or installed on the track) on the heated board; space of the plastic card is <500mm, corner is <250mm, and geothermal pipe laying methods are rotating figure (two-circuit), rectilinear figure (single circuit) and reciprocating figure (integrated type).
Install distribution devices and close with distribution system: the wall where distribution devices will be installed should be plastered in advance; the distribution devices are stipulated to be installed on the wall or in a special box where is over 350mm above the ground and is near to the stove and is connected with bedrooms and living room.
Preserve heat of corners: use the same thermal insulating material to make corner heat-preserving construction.
Conduct bulge test: testing pressure is 0.6MPA as usual; if the pressure reduced in 100min is no more than 0.05MPA, it is tested to be qualified.
Pour fine aggregate concrete to coat cushion: when bulge test is proved to be qualified, immediately pour fine aggregate concrete to coat cushion (mix 5% of anti-checking agent), press and make it dense; at this point, the pipe should keep the pressure that is no less than 0.4MPA.
Re-conduct pressing test according to stipulations of bulge test.
Make the ground floor after it is tested to be qualified.
Points for Attention in Construction
1. Effective measures should be taken to protect plastic pipes from being damaged in construction.
2. If the space of radiant heating floor is over 30m^2 or its length is over 6m, space of packing layer should be set to be no more than 6m, width of dilatation joint should be no less than 5mm, and fill the joint with elastic expansion material that is separated by expansion strips.
3. If the ground floor is expected to bear more loads or avoid cracks, set reinforcement mat above the floor heating layer and set the mat 10-20mm above the plastic pipe with the mesh diameter of 2-4mm and mesh distance of 150mm or 200mm.
4. Before the system is officially open to supply water, wash and press the pipe network system and connect it with the floor heating distributor; it is suggested to set a filter in front of the distributor to avoid dirty objects entering the floor heating system.
Storage, Transportation and Points for Attention
Pipes and fittings should be reasonably stacked in an indoor warehouse to keep away from thermal source rather than in the open air, and the stacking height should be no higher than 1.5m. Pipes should not be casted, exposed to sunshine, stained, stressed or damaged in loading and transporting.
Installation Instructions
1. Cut Pipes: cut pipes to the required length, and the cut should be vertical to pipe’s axis line and should be burr-free and clean. Set appropriate weld length on the pipes.
2. Prepare Hot-melting Welding Machine: install the hot-melting machine and get it charged according to the pipe installation specification.
3. Hot-melting Connection: after the hot-melting welding machine reaches the working temperature, prepare pipes and fittings and insert them into the die head of the machine to appropriate depth; when pipes and fitting are heated for a required period of time, immediately insert fittings into the pipes without swirling and form the even flange on the joints, then keep it for 2-5s, and cool it naturally.


